What and why
I am always sad seeing all the potential damage done to your local system, just to set up your development environment. Every time you do almost the same thing, every time you mess your system up in almost the same way. It really doesn’t matter in which language you’re wrtiting and what frameworks you use but Java (and Maven) is a pretty good, uhm, example.
A development environment is not only about IDE and JDK, in almost all cases we need to have an application server too. We set it up; our application works great on it, but when we deploy it to production we experience deployment issues. Some things changed: we have different JDK, different network interfaces and so on. Everything can affect your application.
Imagine now an environment which is exactly the same as your production.
Welcome to Docker!
Docker makes it easy to create snapshots of your container. This means that you can deploy your app, create a snapshot, push the image to a repository for deployment and launch it in production from there.
I want to make this a series of blog posts about how we can leverage Docker in the Java (but not only) world to make the development more pleasant and expectable with every iteration polishing the setup.
TL;DR;
In this blog post I’ll focus on the application server deployment. It shows how to set-up an environment for developing Java applications for WildFly. It uses JBoss Developer Studio as the IDE and the application is deployed to the server runnning in a Docker container. Curious? Read on!
Please note that everything below is pretty rough, since it’s my first take on it. Any hints on making it more developer friendly are appreciated, just leave a note in the comments.
Preparations
First of all we need to get all the required stuff:
-
JDK: You should have something on your system, if not:
yum install
java-devel
should help. Or go to Oracle… -
Docker: You can use the
docker-iopackage available in my repo if you’re running Fedora. Otherwise you can follow the installation instructions available on the Docker website. -
JBoss Developer Studio: It can be downloaded from the product page.
-
WildFly: It’s required by the IDE to detect what server we’re using and to get all required libraries locally. We can download it from here. Please grab the
8.0.0.Beta1version.
Next steps assume you have everything installed and working.
Docker image
I created a Docker image with WildFly on it. The application server is configured to be ready to run, so we can manage it from the IDE and deploy our applications to it.
The image is avalable in the Docker
goldmann/jbds-wildfly repository.
Please pull it. This will grab the latest version for you:
$ docker pull goldmann/jbds-wildfly
You can now try to run it to confirm that it works as expected:
$ docker run -i -t goldmann/jbds-wildfly:wildfly
The container is running. You can use your IDE now to deploy your apps.
Great, it works. Now we can proceed to the IDE setup.
|
Note
|
You can run the container in detached mode by using the -d switch. See
the documentation of the run command for more info.
|
JBoss Developer Studio
Lets open JBDS and teach this thing to talk to the application server.
Adding a new remote connection
|
Note
|
You can skip this by importing the connection. Right click in the Remote Systems tab, select Import…. |
In the Remote Systems tab we need to create a new connection to the Docker container. Please select Linux from the list.
In the next step please leave the Host Name field with LOCALHOST entered. Last, specify the Connection Name, I choose Docker.
|
Note
|
The prepared Docker image exports the following container ports: 22, 8080 and 9990 as local ports: 10022, 18080 and 19990. |
In the Files step, select the ssh.files configuration. In the Processes step, select the processes.shell.linux configuration. In the Shells step, select the ssh.shells configuration. In the Ssh Terminals step, select the ssh.terminals configuration.
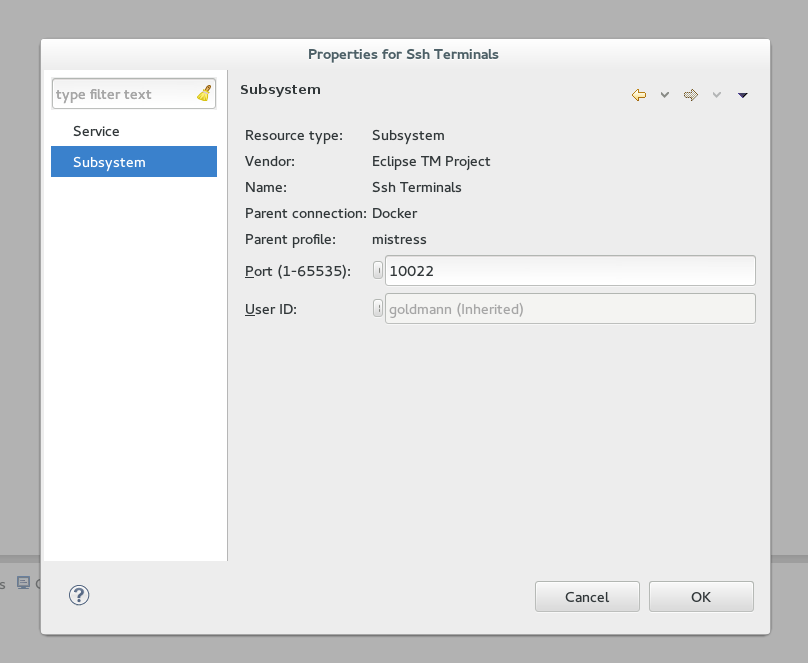
After you create the connection, please right click on the Ssh Terminals and select Subsystems. On that page we need to change the port from 22 to 10022.
Now we can try to connect to the container, right click on the connection and select Connect. You’ll be asked about password and user ID, please use root / verysecure.
|
Note
|
If you select the Save password option you can be asked for creating/using the Secure Storage Password. |
A nice feature is the Ssh Terminal — you can launch one and execute commands directly inside the container. Try it!
Troubleshooting
If you hit any issues, please try following:
-
Please make sure your Docker container is running.
-
Check firewall. Docker container (at least on Fedora) are connected the docker0 interface.
-
If this doesn’t help — let me know in the comments, I’ll try to help.
Adding a new server
Please unpack the WildFly zip you downloaded.
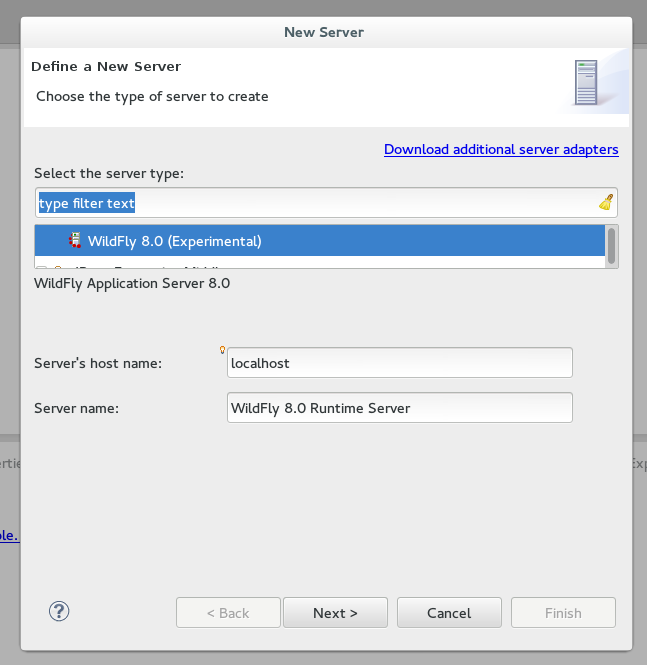
In the Servers tab please add new new server. From the list of available server choose JBoss Community > WildFly 8.0 (Experimental), click Next.
Please change the Server’s host name field from localhost to 0.0.0.0. Because of the nature of the containers this will let us manage the server from IDE directly.
In the next step in the Home Directory field specify the directory to where you unpacked the WildFly zip content.
In the next step please check the Listen on all interfaces… and Expose your management checkboxes. We need to change the deployment from local to remote, please select Remote System Deployment from the dropdown.
After finishing the host set up wizard select the newly created Docker host from dropdown.
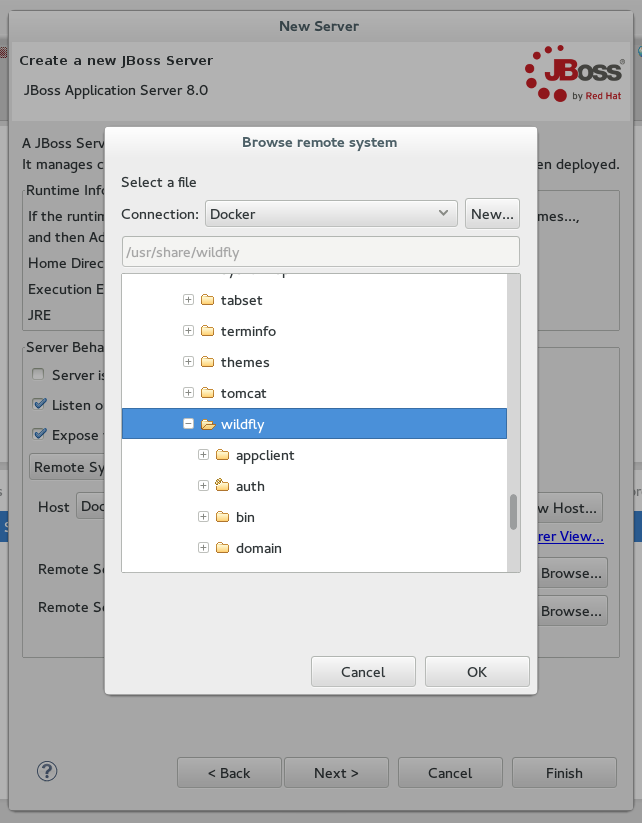
We’re ready to set the Remote Server Home field. Click Browse and expand Root > / > usr / > share > wildfly.
The last thing is to change the server settings, double click on the newly created server.
In the Server Ports section please change the web port to 18080 and management port to 19990.
In the Management Login Credentials section fields please enter admin and Admin#70365 as credentials.
You can now try to start your server. See the Console tab for the output.
OK, we have now a new server defined, which is running inside a container. Let’s prepare an application to make use of it!
Application
JBoss' developers provide a great set of examples for various technologies under the JBoss Developer Framework. There are many articles, videos and — most exciting — code.
We’ll use one example by creating a new project, select File > New > Example… > Project Examples. Feel free to select example what you want. I used the Web Applications > kitchensink one.
JBDS will download all the required code and preapre it to run.
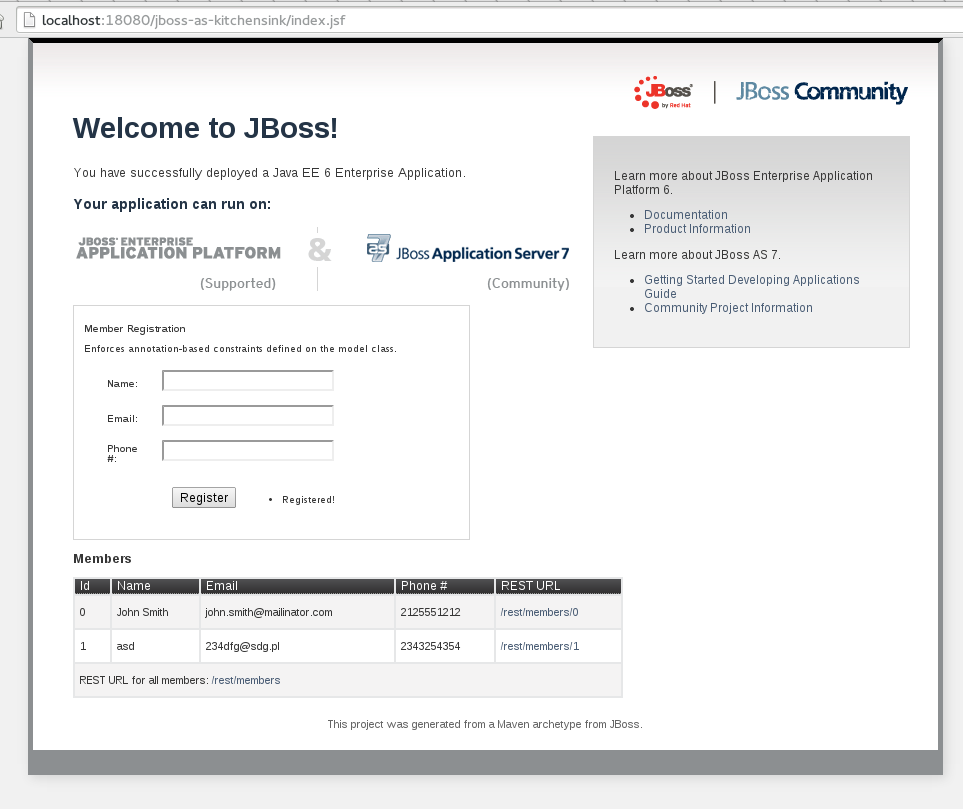
The last step is to add the application to the server. It’ll be automatically deployed and ready to check at http://localhost:18080/jboss-as-kitchensink.
Done
Please note the that you can stop the container, launch another one and still be able to develop your app!
If you get hit by a long deployment time, then most probably you see the JBIDE-12202 which will be fixed in the next version of JBDS.